MICRONITE enables a company to conduct error-proof predictive control of product quality and thorough investigations of multiple causes of variation and failures within one system. The MICRONITE system ensures a high level of confidence in data quality using a combination of methodologies to validate data accuracy and apply correct acceptance criteria for in-process and offline inspection. MICRONITE software helps decrease quality costs and incident rates by addressing the source of the problem while demonstrating a commitment to profitable production effectiveness.
- A single access point for aggregated information on product quality by date/time, part name, machine. etc.
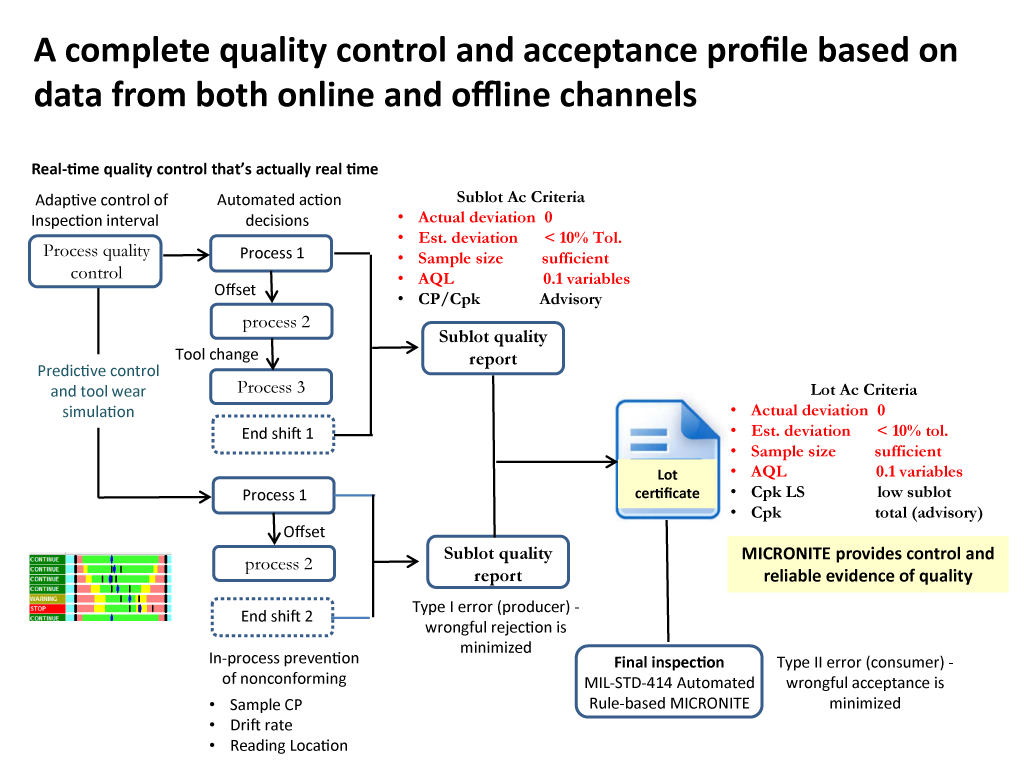
- 3-step quality acceptance protocol for in-process inspection includes: (1) defect-preventive control between actions, (2) low-risk statistical quality acceptance of sub-lot (shift), and (3) statistical quality acceptance of multiple sublots forming an entire production lot
- MICRONITE quality foundation tools provide thorough analysis of strengths and weaknesses of engineering design
- Effective planning for optimal inspection process by generating class-sensitive sampling schemes
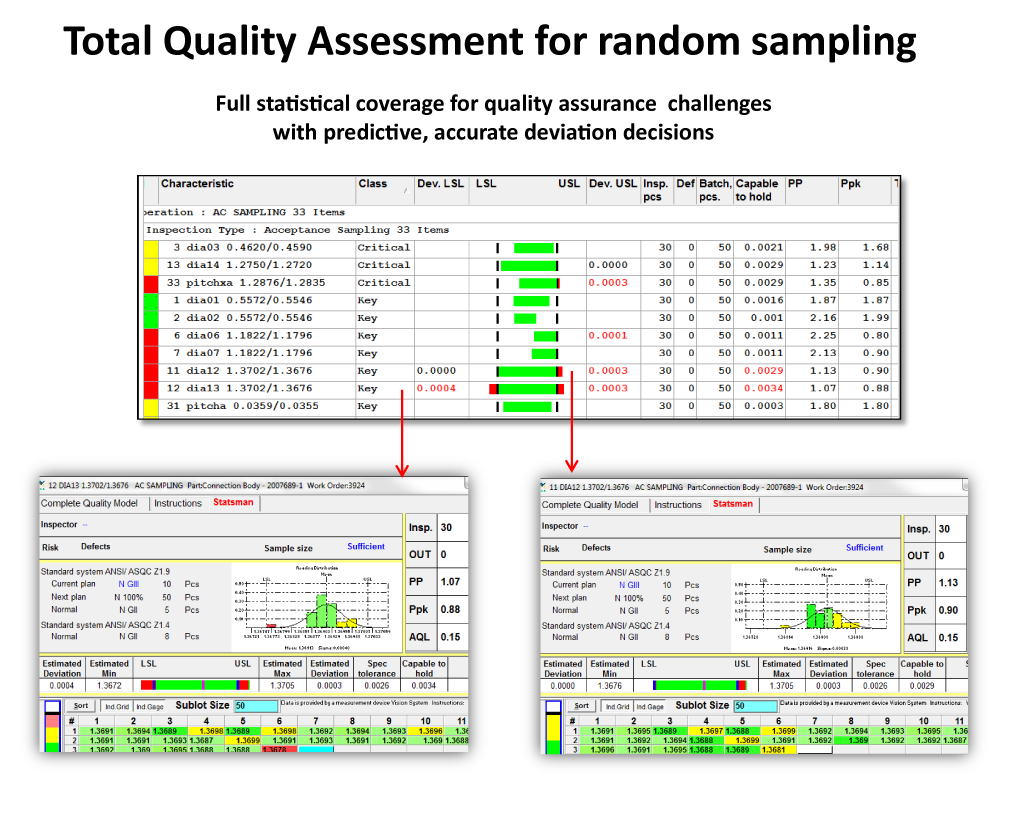
- A broad range of distributional (CP, Cpk, PP, Ppk, AQL) and non-distributional estimates of quality
Error-proof quality certification by shifts, sub-lots, multiple sub-lots, and lots
1. Sample size control. Sufficient total sample size for sub-lots and lots is validated using control plan assignment (in-process sample size and inspection frequency) and cycle time (production rate per hour). Further, total sample size is examined to match available control plan within MIL-STD-414 and MIL-STD-105E. It is stated that the risk of errors is very high if a control plan is not enforced and sample size in not sufficient.
2. Actual deviation from specification.
3. Estimated deviation from specification. Deviation parameters for acceptance of product quality are reported for sub-lots and lots. Estimated deviation is computed by proprietary MICRONITE one-sided (non-distributional ) function providing high confidence level. Anticipatory deviations which are computed for close to a specification limit samples instead of overall distributional statistical model tell the user to accept a lot or alert him (her) to review process records.
4. Values of AQL. MICRONITE solves a reverse task of finding a matching plan for pieces produced vs. pieces inspected with calculation of corresponding AQL. First, MIL-STD-414 is used for calculation of AQL for inspection by variables. and second, MIL-STD-105E is used for examination of AQL l
5. Values of CP and Cpk for mixed sub-lots. CP and Cpk are calculated using the estimated sigma for all measurements.
6. All the above provide a very low probability of acceptance errors.
A solution to create the value-added inspection process
MICRONITE’s inspection utilities cover the following fields:
– In-process predictive control of geometric characteristics of the machined parts
– Off-line random sampling for receiving and final inspection by variables
– Validation and control of measurement capability of instruments and operators
– First Article Inspection and tool-based set-up quality approval
– Machine-and-tool capability analysis and root cause detection
There are three primary objectives for control of real-time inspection process: (1) determining the ongoing quality conformance status, (2) verifying the adequacy (timeliness) of sampling inspection for control of tool wear and process stability, (3) verifying measurement accuracy and reliability of inspection data. MICRONITE provides all essential tools to prevent measurement errors, achieve completeness of inspection process, and assure the highest level of data reliability. Maintaining the permanent state of absolute data accuracy is vital for risk-free control of in-process and off-line quality.
De-centralized process quality documentation
One of the critical mistakes in statistical data utilization is an attempt to centralize representation of the process capability but not certify product quality at the time of production. As a result, cumulative statistics distorts actual process capability, miscalculate the status of product quality and hide problems with one or more process components. MICRONITE executes process analysis and quality certification fragmented by individual tools, shifts, and sublots. Quality certification is completed at the point of production. Consequently, the risk of acceptance errors Type I and Type II is dramatically reduced.


